Showing posts with label cooking. Show all posts

Tuesday, December 16, 2014

Tuna casserole that isn't terrible

Tuna casserole is one of those dinners I tend to put on our menu when I have completely run out of inspiration or I am trying to be frugal, or both. I suspect the recipe I have came from the back of a can of mushroom soup. It is just so very bland and boring and what I think of when I think of 1950s recipes (the ones you see in old magazines, with lots of Jello "salads"). Since it <i>is</i> handy to have an inexpensive, mostly healthy casserole recipe in one's back pocket, I have started to tinker with my tuna casserole, and the last two times I done so, everyone has gone back for seconds. Tonight, I got raves (from everyone except Malcolm, but he really just wanted a candy cane anyway). After I mentioned this fact on Facebook, several people said they'd like a recipe, so here it is, annotated. I hope it works as well for you as it does for me.

Hope's Tuna Casserole
Preparation: 20  minutes
Cooking time: 20-30 minutes

1 pound pasta - bowties or some other shapes work well. They are sturdier and hold the sauce better than the traditional egg noodles.
1-2 Tbsp oil, divided
1/2-3/4 cup diced onion
2 sticks celery, diced
1 cup or so chopped mushrooms - I prefer baby bellas, but whatever sort you like/can find at the store would be fine.
2 cans tuna - I keep it simple and use chunk light tuna in water
1 can cream of chicken or cream of celery soup (this is the biggest change - cream of mushroom is just so...gray)
1/2 cup milk - I used whole milk this time, but whatever you normally use would be fine. 
1 1/2 cups frozen green peas or frozen peas and carrots
salt and pepper
1 cup grated cheese - I used sharp cheddar this time, but I have also used pepper jack with success

1) Preheat oven to 375. 
2) Cook pasta according to the instructions on the bag/box. Drain and put back into pot or in a large mixing bowl.
3) Sauté the onion and celery in half of the oil until soft, but not brown. When finished, add to the noodles.
4) Heat the second half of the oil and sauté the mushrooms until they are soft and have released some of their juices. Add to the noodles and onion/celery mix.
5) Drain the tuna and add to the pot. Also add the soup, the milk, and the peas. Stir everything together and season with the salt and pepper to taste. 
6) Pour the noodle mixture into a two quart casserole dish. Top with the grated cheese.
7) Bake for 20-30 minutes until bubbling and the cheese is melted. If you like the cheese a little browner, turn on the broiler for the last couple of minutes.

Tuesday, December 2, 2014

Thanksgiving dinner


Since this is apparently now primarily a food blog, here is the Thanksgiving dinner we had this year. As you can see, it isn't the traditional turkey, stuffing and mashed potatoes. Some years we go to all that trouble, but more often we prefer to make something different. It is more fun, usually less work, and perhaps even a little bit healthy. This year, we had turkey-zucchini meatballs and sumac sauce from the Jerusalem cookbook. (Here is a slightly modified version from Simply Recipes, if you don't want to seek out the book. But you should at least get it from the library, since it is a beautiful book, as well as full of good recipes). The recipe calls them burgers, but I call them meatballs.  Either way, they are delicious, and the sauce is good enough to justify seeking out sumac. (You can order it from Penzey's, here.)

To accompany the turkey, I made acorn squash stuffed with black beans, corn, and broccoli from a recipe I found at the New York Times website. It was intended as a vegan main course, and I think it would definitely be good for that, but it was also a perfect side. It is very American too, with the squash, corn and beans. I left out the optional rice, since we made our own wild/brown rice as well. To round out the plate we had sweet potato biscuits brought by a friend.

I neglected to get a picture of the pumpkin cheesecake that we had for dessert. Too busy eating it. It also turned out really well. I used ginger snaps in place of the graham crackers in the crust, and they added just enough snap and flavor.

In short, we had a lovely meal, and I heartily recommend giving alternative menus a try for the holidays.

Friday, November 21, 2014

Oh, granola

You know how I complained a while ago about my problems with oatmeal? About how it never keeps me going and how it makes me have blood sugar crashes? This makes me sad, because I do like oats and oatmeal, and it is a good whole grain to have in my diet. It must be something about the cooking process that makes oatmeal not like me, because I have no such problems with granola.

I have posted a lovely granola recipe here before, and I still love it, but with all the various dried fruits that require a trip to Whole Foods, I don't make it very often these days. And after making my own, I can't really face the granola from the store - it is just not worth it. Luckily, I found a new, simpler recipe for granola on one of the best food blogs ever, Orangette. It is just oats, nuts (I used almonds and pecans), salt, coconut, maple syrup (which doesn't taste at all maple-y after cooking, in case you - like Benjamin - don't like maple flavor) and oil, and it tastes heavenly. I made a half batch a week or so ago, and devoured it. I made another batch today, larger this time, because I was craving it.


Here is the original recipe and post over on Orangette. I am not going to post the actual recipe because you should go read it straight from her - she is such a good writer - and because she has some helpful instructions. Not to mention links to other granola recipes. Go try it. You will thank me.


Monday, November 10, 2014

Let's revisit my summer with fruit

The weather is finally turning cold here in Arkansas, and a polar vortex is threatening later this week. The leaves are falling (and falling and falling. Turns out some oak trees are marcescent, which means they retain some of their dead leaves all winter, or as it plays out in our backyard, about half the leaves take two months to fall in October and November, and the other half stay on until March, when I have to rake all over again.) Anyway, as I was going to say, before I interrupted myself, it is getting cold, and while I am perfectly happy with that, it seems like a good time to revisit some of the lovely warm days of summer, and the food I never got around to showing you.

Oh, heavenly blueberries!

This year, for the first time since I left Washington 13 years ago, I found a farm offering u-pick blueberries. As I have mentioned before, my summers growing up were full of fresh berries, and one of the things I have missed dreadfully over the years is berry picking. It is one of the experiences of my childhood that I most wanted to be able to share with Malcolm, and I feared it would only happen on the occasional trip back to Washington.

Malcolm, with one of his favorite foods
 I have never been so happy to be wrong. Wye Mountain Flowers and Berries is about 45 minutes away from us, and they have blueberries, blackberries, and raspberries. We went twice and picked all three. Malcolm caught on immediately, and while there was a certain amount of berry eating, a la Blueberries for Sal, he actually got some in the bucket too.

Blackberry jam
We had so many berries that we couldn't eat them all right away, so I did what any sensible person would do and made jam. Blackberry jam (above), blueberry jam, and even blueberry ginger jam (recipe from a fellow Whitman Alumna's great canning blog). Add these to the strawberry jam I made earlier in the year, and we might just make it to next summer.

Pickle coins!
I made pickles around the same time as well, although we still have some from last year. I can't help it - when cucumbers are so easily available and so easy to preserve, I sort of get carried away.

Mid-way through the process
After berry season ends in mid-to-late June, pesto season is not far away. I have always planted basil in my garden, and I usually have enough to make pesto. The last couple of years, I have had so much basil that not only do I make pesto by the quart, I have enough to dry and freeze for other cooking uses as well.

Mmm, pesto.
Last year, I decided to use pistachios instead of pine nuts, and this year I used cashews. Both are delicious alternatives if you are one of those people who have an allergic reaction to pine nuts. We usually freeze our pesto and use it all winter long, both on pasta and as a pizza sauce. So much better than the stuff you buy in jars at the super market!

The second box of the season, Golden Delicious
And of course, how could it be fall without a box of apples, or rather two, 40 pound boxes of apples, in my kitchen? I didn't manage to score enough peaches this year to preserve any - not sure if it just wasn't a good year for them, or if I just didn't try hard enough (probably the latter, since I do know an orchard that does u-pick), but I made up for it with the apples.

My apple processing workspace.
You'd think that after spending several days peeling, slicing and dehydrating apples, not to mention several pies, including a *real* double crust apple pie, I would have had enough of apples. You'd be wrong. I immediately bought a second box, and am only restraining myself with difficulty from getting a third of a different variety.

I was mightily proud of this pie. Usually I go for a more rustic (read, easier) sort of pie.
And that concludes my tour through my summer cooking. Now it is fall, and time to bake warm bread and cookies and pumpkin goodies. Wonder what I will make next?

Monday, October 27, 2014

I'm back, and I bring soup

Yup, it has been a while since I last blogged anything. Life has gotten in the way, and to be honest, Facebook has made me tired and wary of so much sharing of personal details. But I miss blogging, and this soup has inspired me - it is a soup that everyone in the house loves, and something that good has to be shared.

My dad always brings recipes when he comes to visit; we look forward to not having to cook while he is here, and he looks forward to sharing favorites with a new audience. During his visit in March, he made this one for us, and it was a big hit. It is a broccoli, bean, and pasta soup from an Italian cookbook that he bought in Florence, Italy called Cucina Rustica by Viana La Place and Evan Kleiman (it looks like it is/was available here in the United States as well, if you are inspired to find it yourself). On first glance, it doesn't appear to be magical - just broccoli, beans, and pasta - but there is just something about the way the ingredients come together. Malcolm is not a picky eater by any means, especially compared to other toddlers, but he tends not to eat soup in its fully assembled state; he will eat beans, and vegetables, and pasta, and meat - just not all in one spoonful. This soup? He slurps up and asks for seconds. So do I, and I don't mind that the recipe yields so much soup that I end up eating it for days afterwards. 


I didn't remember to get a picture while it was fresh, so this is a little less soup-like than it is when first cooked, but I think you could add more broth when you reheat it, if that bothers you. I like just as it is.

Without further ado, here it is:
Minestra della Fattoria (Broccoli, Bean and Pasta Soup) from Cucina Rustica by Viana La Place and Evan Kleiman. Serves 6-8. Takes about an hour.

1 red onion, peeled and chopped
4 tablespoons extra-virgin olive oil (I confess to using canola some times)
6 garlic cloves, peeled and minced
1 sprig fresh oregano (I used 1 teaspoon dried)
2 springs fresh thyme (I used 1 teaspoon dried)
1 bunch broccoli, chopped very fine (I use one of the bundled bunches from the grocery store that have three crowns, and use some of the stems too if they look OK)
2 15-ounce cans cannellini beans, undrained, or three cups cooked dried white beans with their cooking liquid
6 cups chicken stock
4 ounces dried pasta, such as elbows, broken spaghetti, or tiny shells (this time I used a mix of elbow macaroni and ditalini)
Salt and freshly ground pepper to taste (I used about 1 teaspoon of salt this time - the amount may vary, depending on how salty the beans and broth are)
Parmesan cheese for grating at the table

Saute the onion in the olive oil in a soup pot until it is soft. Add the garlic and saute until it turns opaque and releases its aroma, about 2 to 3 minutes. Add the herbs and the broccoli, and cook over moderate heat until the broccoli is quite soft. Add the beans with all their liquid and the chicken stock. Cook at least 15 minutes, or until the soup thickens. Add the pasta and cook it in the soup until al dente. Add salt and pepper to taste. Serve immediately and pass Parmesan cheese to grate into the soup.


Monday, October 14, 2013

Fall cooking


It is fall again, and for the last month or so, I have been busy finding ways to preserve and use some of the bounty. We had enough jalapenos this year that even Benjamin couldn't eat them all, so I tried pickling some. I think I had about a pound and got three pint-sized jars.


Apart from having to wear gloves to avoid getting too much hot stuff on my hands, it wasn't any harder than making regular pickles. They have to cure for a while, so we haven't tried them yet.

I made another batch of regular pickles yesterday too, after I bought a vegetable assortment box at the farmer's market that came with two pounds of cucumbers. There was no way we were going to eat all of those - I like them in salads but often forget to use them, and they don't last very long. I discovered after I started that I was all out of dill seeds, and since Malcolm was napping and I didn't want to waste time, I decided that I would use caraway seeds instead, since I had two cans of those (why?!). I have used them before and can't say that I really noticed a difference, so the three jars I made yesterday should be fine, if not kosher dills.


My other preserving challenge was entirely self-inflicted. I ordered a bushel box of apples from the farmer's market to dry in the dehydrator and use for apple crostatas and other such yum-yums. For several nights after Malcolm went to bed, and one early morning when he had me up at 5 AM, I spent an hour or two peeling and slicing apples and putting them on trays. 


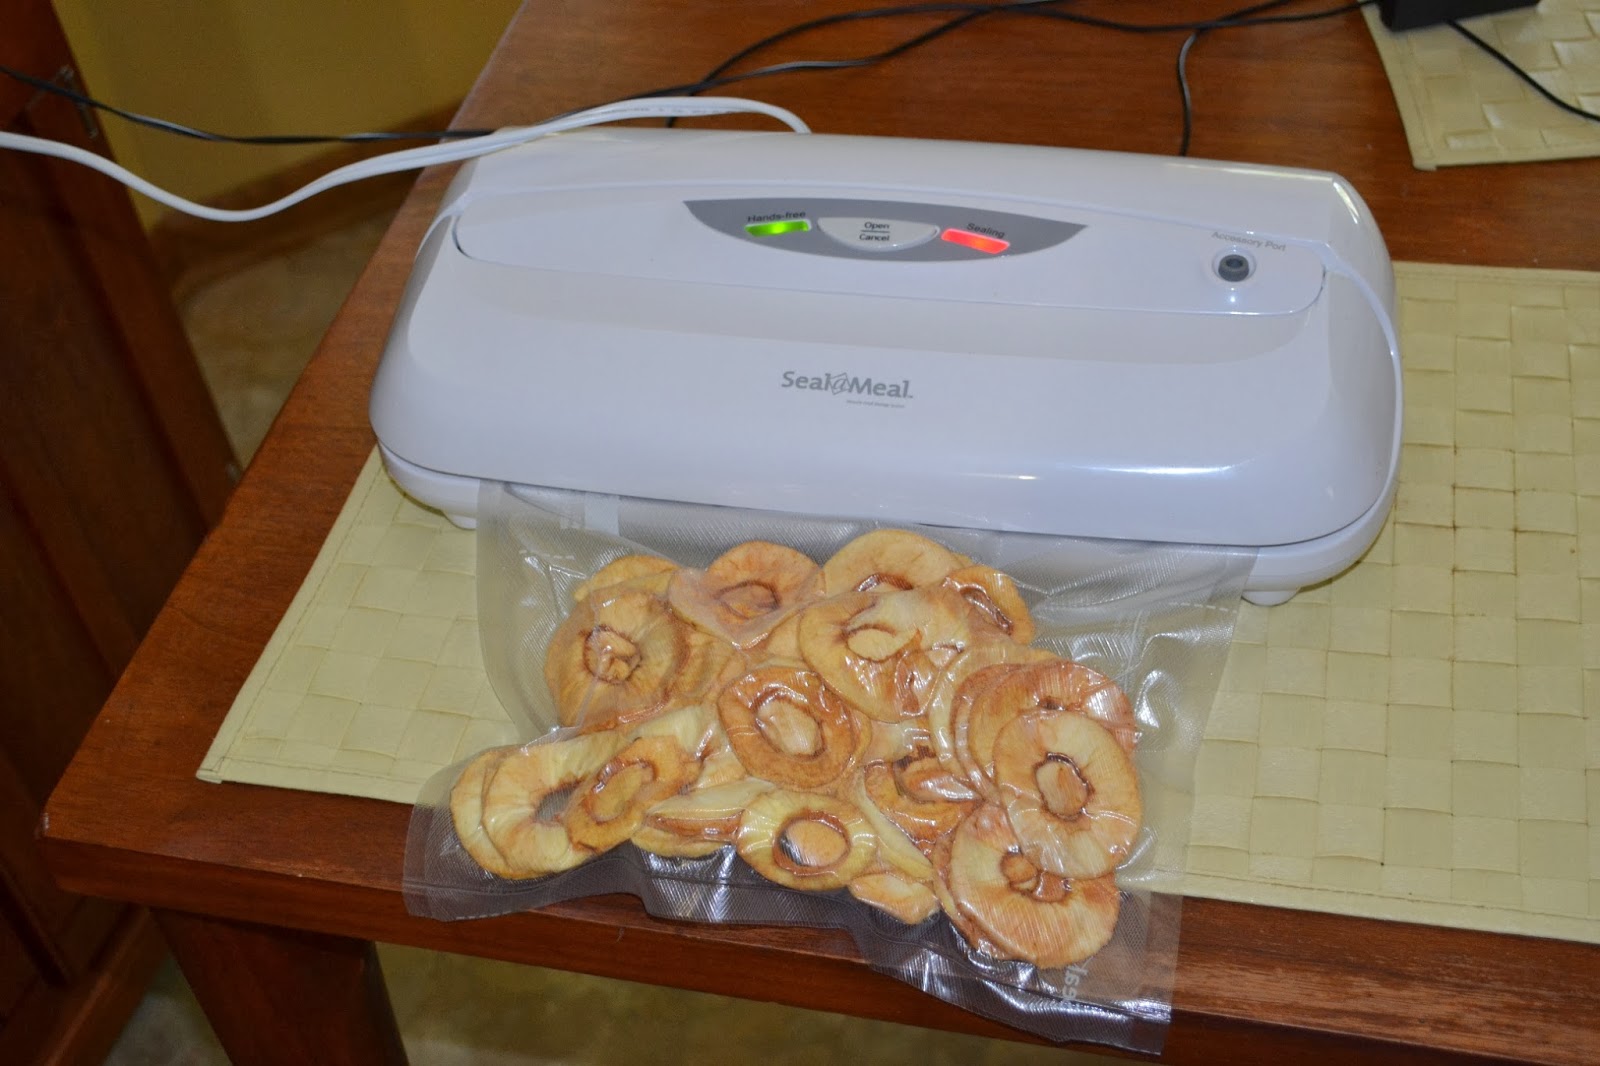
Of course, the next day I had to bag them up. I put some into a ziplock bag for immediate consumption and vacuum-sealed the rest. We've had one crostata so far, and I plan to make another this week while my mom is visiting. I still have at least four pounds of those apples in the fridge, and then I went and bought another 6 pounds of other varieties, so there may be another night of peeling and slicing in my future. Or maybe applesauce. We'll see.

The last challenge is the most difficult - collard greens. I seem to have planted a few too many this year, and we are over-run. I've used it in place of kale in a gratin, make our standard collard greens and black bean wraps, used it in omelets, given some away...The problem with greens is that you can't really can them at home, so you have to find ways to use them while they are fresh. I just saw a recipe for kale chips in the microwave that said you could substitute collards, so that will probably be my next project.

Tuesday, July 5, 2011

An Easy Weekend Recipe

Would you believe I was actually too busy over the three-day weekend to do anything with the pictures from my camera? I did get them off the camera, but did not have time to go through them or do any editing. Alas. But I did get the shower scrubbed and made baba ganoush with eggplants from our garden.

I also made up a very Italianate sort of lunch on Sunday that was so good I had it again on Monday. This lovely event came about because we had no left-overs available, although there was quite a bit of food around. Rather than going to the store to buy frozen pizza (my first inclination for any empty pantry problem), I decided to be creative. Don't know what came over me!  Anyway, I decided to combine cous cous with cherry tomatoes from the farmer's market, some sun-dried tomato pesto, a can of tuna, and some Parmesan cheese. After the cous cous cooked, I just threw everything together, added a little bit of salt and pepper, and voila! It was tasty, and thanks to the protein from the tuna, filling. Monday we had the same situation - plenty of food but no leftovers - so I made the dish again, only this time I used sardines in olive oil instead of tuna. Benjamin, with a bit of surprise in his voice, declared it quite palatable (not in those words, but close enough). Needless to say, I was quite proud of myself. I am, if I say so myself, a good cook, but I tend to rely on recipes for most of my dishes. To throw something together and have it not only not be disgusting but actually taste good was a nice little boost.

Tuesday, March 15, 2011

Making ravioli

Filling the ravioli mold
Over the weekend, I got it into my head that I needed to make ravioli, and bake bread, at the same time. (Well, strictly speaking I didn't plan that both had to be at the same time, it just happened that the time I did one was also the time I had to do the other). Now, in the past we have tried to make ravioli, and not had much success. Either the filling was too wet, or the dough too sticky, or some such thing. So this was kind of my last-ditch attempt - if I couldn't get it to work this time, I was going to give up on fresh pasta ravioli and just use won ton wrappers. For this final attempt, I used Mark Bittman's recipes (egg-less pasta dough and filling) from How to Cook Everything.

Ravioli successfully released from the mold!
 For whatever reason - maybe I was more careful, maybe the different dough recipe I used was less troublesome - the ravioli worked perfectly. In the picture above you can see my ravioli mold.  It has little cups where the filling goes, and wavy ridges around the edges.  You take the little rolling pin and roll between each piece of ravioli, on top of the ridges, and that helps to separate each piece.

Such lovely, delicious little dumplings...
I think my dough was a little too thick for the ridges to cut all the way through, but I just used the pizza roller to do the final cut. They looked perfect, just like the ones at the store, but without preservatives and extra unnecessary ingredients.
Sprinkled with cornmeal to keep them from sticking - marginally successful.

In all, the recipe made two cookie sheets worth of ravioli. Enough for 4 or 5 people. I served them with a quick homemade pasta sauce and fresh bread.

The loaf on the left barely made it to Monday morning. It is gone now.
 And so, now that I have successfully made ravioli, I am eager to repeat the experiment. Maybe a sausage filling, or pumpkin. Yum.

Wednesday, November 10, 2010

Pumpkin Ice Cream

Here, thanks to the Cooking Light website, is the recipe for the pumpkin ice cream I made over the weekend. Note that it does require 8 hours of cooling time in the fridge before you can actually make the ice cream in your machine.

Yield: 8 servings (serving size: 1/2 cup)

Ingredients

  • 1 1/2  cups  1% low-fat milk, divided
  • 2  tablespoons  dark brown sugar
  • 2  large egg yolks
  • 1  (14-ounce) can fat-free sweetened condensed milk
  • 1  teaspoon  vanilla extract
  • 1/4  teaspoon  ground nutmeg
  • 1/8  teaspoon  ground ginger
  • 1/8  teaspoon  ground cinnamon
  • Dash of salt
  • 1  cup  canned pumpkin (I used pureed pumpkin from an actual pumpkin)
  • 1  (8-ounce) carton reduced-fat sour cream
  • 2  commercial biscotti, crumbled (about 3/4 cup) (I used ginger cookies instead)

Preparation

Combine 1 cup 1% milk and brown sugar in a medium, heavy saucepan, and heat to 180° or until tiny bubbles form around edge (do not boil). Remove from heat.
Place egg yolks in a bowl. Gradually add hot milk mixture to egg yolks, stirring constantly with a whisk. Place mixture in pan. Cook over medium heat until mixture coats a metal spoon (about 4 minutes), stirring constantly. Drain custard through a sieve into a bowl; discard solids.
Combine 1/2 cup 1% milk, sweetened condensed milk, and next 5 ingredients (sweetened condensed milk through salt) in a medium bowl. Stir in pumpkin. Gradually add custard, stirring with a whisk. Cover and chill at least 8 hours.
Combine 1/2 cup pumpkin mixture and sour cream, stirring well with a whisk. Add sour cream mixture to chilled pumpkin mixture, and stir until well blended. Pour the mixture into freezer can of an ice-cream freezer, and freeze according to manufacturer's instructions.
Spoon ice cream into a freezer-safe container; fold in crumbled biscotti. Cover and freeze 1 hour or until firm.

Taken from Kathryn Conrad, Cooking Light, SEPTEMBER 2002 (Have I really been holding on to this recipe for that long, never to have tried it before?! What was I thinking?!)

Monday, October 18, 2010

Well, I'm awake

Because I had to fetch Benjamin from the airport at 11:15 last night, I was up way past my bedtime. Because I had to get up to go to work this morning, I didn't get enough sleep. So I am relying on several things to keep me going today:
  • A cup of strong tea.  Today it is Twinings English Breakfast. My favorite is Amhad's Imperial Blend, a mix of Earl Gray, Assam, and Darjeeling. I think it is technically not for sale in the North American market, because the only place I have ever found it, including deep searches on the internet, is a Middle Eastern grocery store in Austin. I didn't use it today because it is loose-leaf, and I wasn't sure I was coordinated enough to fill the tea ball and get it into the cup without making a huge mess. (OK, that is an exaggeration, but it may not be by the end of the day). I can't drink a soda or coffee because my body can't handle that much caffeine without making me extremely jittery - yes, I am a caffeine wimp - not to mention the amount of sugar in a soda would make my stomach and head hurt. So, tea it is.
  • Fishnet tights. One of the unexpected purchases from my shopping trip on Saturday. I have wanted a pair for a while, ever since I started having sock lust. I am hoping they make me feel somewhat spunky today, and that the spunkyness will give me energy. (Hah!)
  • Calzones. A friend and I made calzones for dinner last night, and I have one for lunch today. Calzones are really easy to make, if you make pizza dough from scratch. Instead of rolling the dough out into two large circles, you divide it into 5 or 6 smaller balls.  Roll one ball at a time into a rectangle; spread pizza sauce of your choice on half the dough (we used red sauce on some, and fresh homemade pesto on others); pile on your choice of toppings (sauteed spinach, roasted red peppers, tomatoes, feta, mozzarella); fold the top half of the dough over the fillings and pinch shut; brush with oil. Bake for approximately 20 minutes. Allow to cool slightly or you will either burn your mouth or get scalded by escaping steam. Eat.
Tonight Miikka and I have our first class of sub-novice obedience together. The goal is to get Miikka to learn a long down-stay and to come when called, every single time. I hope I am awake enough by 7 PM to actually be in charge - Miikka is too short to reach the pedals of the car, so he can't drive.

Tuesday, October 5, 2010

Peach processing part II

Excailbur, fully loaded
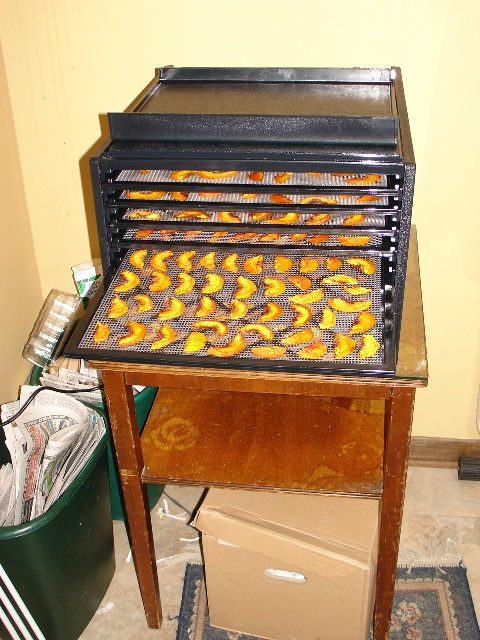
 Once the peaches were in the dehydrator, I didn't have to do anything to them until they were finished. Just turn on Excalibur and let them dry. My dehydrator holds 9 trays, and I filled them all. I probably could have done a second, smaller batch, but decided to freeze those peaches instead. That way, I have snacking peaches, and peaches that I can use for future smoothies and pies.


Yummy little slices of summer
Each tray is made of two parts: the black supporting layer and a plastic mesh.  This is a different design from my father's dehydrator, and it has one great advantage: the mesh is flexible and removable. What does this mean for me? It means I don't have to scrape the peaches off with my fingernails or leave bits stuck to the trays.  The mesh can flex and pop the peaches right off. Even the most stubborn peach pieces came off with a minimum of fuss.

These won't last very long...
To store the peaches, I used a vacuum sealer and its special bags.  I had to buy this at the same time as Excalibur. It was such fun to use, I was actually looking around the kitchen to see if there were any other objects that needed to be sealed! Anyway, now the peaches will last for quite a while, or they will, if we don't eat them all. We have already munched through one bag. They are just so good!

Monday, October 4, 2010

Peach processing, part I

I need a bigger stove!
Here is the setup I had on Thursday night as I processed the peaches for the dehydrator.  The pot on the left is for boiling them to loosen the skins, while the pot on the right is full of ice water to cool the peaches so that I can actually handle them to remove the skins.

Bobbing for peaches!

I only did as many peaches would fit in the pots at a time, so they wouldn't get too soggy while I worked on them.
The pits went in the garbage, while the skins got saved for the compost bin.

The newspaper is a must if you want to prevent peach juice from getting everywhere
Once the peaches were skinned and sliced I put them in an ascorbic acid solution to prevent browning.  My salad spinner worked really well for this step, because I could easily lift the basket out to get any stragglers without having to fish around in the peachy water. The newspaper is to protect the counter, and to keep the mess to a minimum.  Since it was me doing the work, any mess minimization strategy is good; I once managed to get molasses on the ceiling. In other words, I am a messy cook. My dad always used the newspaper to attempt to keep the juice from getting on the carpet as he carried the trays down to the basement (not that it worked - I take after him in that department). Once all the trays were loaded up and in the dehydrator, it was time to fire it up and wait. Tomorrow: dehydrated peaches!

Wednesday, September 29, 2010

35 pounds of peaches

A fraction of the box of peaches
This past weekend I bought a box of peaches. As you may recall, from previous posts, I love peaches. My dad used to buy boxes of peaches every fall to slice and put in the dehydrator.  They would be set out on the dining room table, and the kitchen counter, and any other flat space, to ripen, filling the house with their lovely perfume.  Then they would all ripen at once, and the kitchen became an unsafe place to be in the evenings, as he peeled and sliced peaches like a madman (well, OK, and time he is in the kitchen he is kind of like a madman, even if he is only making a sandwich), laying them out on dehydrating trays and dripping peach juice down the stairs and through the hallway to the dehydrator hidden in the storage room. Peaches bought directly from the farmer, as these were, and as were those long ago peaches, taste nothing like the mealy, rock hard one minute, over-ripe the next, peaches that you can buy at the store. As a result, canned peaches, dried peaches, and any other peach products all taste that much better.


Raspberry vodka, brandy, and rum
Anyway, I bought this box of peaches, and now I had to think of what to do with them all. I didn't really want to can them, although I like eating the results in the middle of January and remembering that winter doesn't last forever (especially not in Arkansas). Cobbler is always a good option, but wouldn't use enough peaches to make a noticeable dent in the box. Then our friend Taine mentioned a recipe she had just seen for making boozy fruit - fruit marinated in sugar and hard alcohol. Canning without some of the fuss and mess of canning. Perfect. I found the general recipe at the New York Times and decided to give it a try. After a trip to the liquor store, I made six jars, two each, of boozy peaches in raspberry vodka, brandy, and rum. You will have to wait until December or January to hear how they turned out, since they have to marinate for 3 months before they are ready to eat (or should that be imbibe?). I also made a batch of peach frozen yogurt, which was divine.

From several years ago, but the scene will be similar tonight.
 Of course, six jars of peaches and a half gallon of frozen yogurt also hardly make a dent in a 35 pound box, so I did the sensible thing and ordered a dehydrator. Well, maybe it wasn't entirely sensible - would have been cheaper just to can the darn things and be done - but I have wanted one ever since I moved away from home, and I do so love dried peaches... Excalibur (hey, that's the name on the box) arrived yesterday, and I will be spending my evening peeling peaches, slicing peaches, and getting peach juice all over the kitchen.

Thursday, September 2, 2010


This is turning into the summer of trying to can new things. First pickles and now pears. Not that pears are all that different from peaches, but I have never canned them before. Anyway, my CSA/farmer's market had pears for sale a week or two ago, so I decided to purchase a batch and can them. Canned fruit is just lovely in the middle of winter, especially if you are trying to eat locally as much as possible.


I used the reliable Joy of Cooking for my instructions, which were much the same as for peaches.  Peel, boil in syrup, can. I managed to do it in about an hour on Sunday afternoon. Now, I was only doing about 5 pounds, or 3 1/2 jars, but still, pretty simple.


Here you can see both my canning pot, on the left, and the pears boiling in their light syrup, and my canning funnel - best tool I have for canning (although I could definitely use one of those grippers for wide neck bottles...).


Close up of the pears. One difference from the peaches is that I used an anti-browning powder to keep them a lovely white color. I could have used it when I canned peaches (Dad always did when he dried apples), except that I didn't have any on hand. This time, I made sure I was properly prepared.


Love the steam coming off the top of the funnel in this shot. It was all swirly in the air-currents from the boiling water and the air conditioner.


And the final product. I had a small amount left that wouldn't fit in the jars (but not enough to make the little jar into a big jar) so I stuck it in the fridge and at it for breakfast this week. Yum.  There may still be peaches available at a market or farm stand, although this summer has been so hot and dry that isn't a given, so I may have more canning to do this month.

Monday, August 2, 2010

Makin' pickles

Cucumbers, washed and ready to be pickled
Earlier this summer, before it had been so hot for so long, I decided to try my hand at making pickles.  I have canned various fruits and made applesauce and jams, but I have never made pickles. All the recipes I looked at seemed really easy, too easy even. I mean, surely it should be difficult? No? All I have to do is make a brine and put everything in the jars? Huh. Well then, let's give it a try. I used the dill pickle recipe from The Joy of Cooking (the 1960s or 1970s edition), with a few consultations of various web sites.

Slicing up the cukes.
The cucumbers are from the farmer's market, a variety specifically for canning and/or pickling.  Since I like pickle spears and don't plan to eat them in sandwiches, I went with the spear shape. It was also the quickest - only 2 cuts per cuke.

More cukes...
Some of the cucumbers did have to be cut in half because they were too tall for the pint jars, but again, not too difficult to prep.

Sterilizing the jars
I had plenty of jars in the garage, left over from previous canning projects. I just needed to buy new lids - apparently, the little rubber seal only works once. But, the jars did need sterilizing, since they had been sitting in the garage for a year or so.

Look at that busy stove!
The brine was really simple - pickling salt, vinegar, and water. Just boiled together. So simple. Too simple?

3 jars of pickles, whoo!
Once the jars were filled with the brine and dill seeds and the lids were on, I re-boiled the jars. I think that step was sort of optional - if you are going to eat the pickles right away, they can just be stored in the fridge.  Since I was planning to store the pickles for longer, I boiled them.  We haven't tried them yet - I think I am still not convinced that such and easy process is correct, or safe or something, but we will, soon enough.

Thursday, March 11, 2010

Gyoza, yum

We made gyoza by hand this weekend, and it was good. Gyoza are small dumplings, filled with a mixture of vegetables and meat (or tofu, I suppose, although I would rather just have vegetables at that point). I love to order gyoza when we go out to an Asian restaurant, but I also love to eat them at home. Because I don't really like buying frozen meals, I don't buy them at the grocery store, which severely limits my access. Now, though, I have made them and know I can make them any time (well, any time I have an hour to fill all the dumplings and then another 30 minutes to cook them...).

I used a recipe I found here*, and modified the process just a bit. Instead of hand chopping the vegetables I used my Cuisinart to chop all the vegetables and to mix the pork in, and since I know my own limits, I used store-bought won ton wrappers instead of making them from scratch. It took a while to fill all the wrappers, and the filling did use an entire package of wrappers, but with Benjamin doing the cooking part, everything went pretty smoothly. They were so yummy, and we have plenty in the freezer for my next snack attack.

*(I am sure there are plenty of other variations on this recipe out on the interwebs, and even, gasp, in cookbooks. This just happens to be the one I used.)

Thursday, January 21, 2010

More granola

Ways to eat granola:
  • Straight - grab a handful and toss it back. That is what I have done for dessert the past few days.
  • Mixed in with yogurt - I use homemade plain, Benjamin uses Wallaby, various flavors. The tartness of the yogurt contrasts nicely with the honey sweetness of the fruit and oats.
  • Sprinkled on top of ice cream - self-explanatory, and possibly better than chocolate sauce.
  • Baked into bread - I have not tried this myself, but have several recipes for granola bread. I am not sure it is necessary, since oatmeal bread is granola without the oatmeal flakes being baked. I suppose if you had a special type of granola...but the granola I made this week is far too good to waste in bread.
Yum.

Wednesday, January 20, 2010

Granola

Our friend Amber gave us a bag of homemade granola for Christmas, little knowing what she would set off. It was a lovely, fruit-filled granola - with figs, dried apricots, craisins, dried cherries, almonds, cashews and coconut. You can't get granola like that at the store, even Whole Foods. There, the granola only has one fruit, maybe two at most, with little crunchy puffed rice and other sorts of grains. And it isn't fresh. So, after we devoured our gift bag, I began to beg for her recipe. This weekend, I finally got it, and was at Whole Foods, so I could get all the dried fruit. I made a batch, and as soon as it was mixed together, we started munching on it. Last night, I had granola for dessert instead of mint cookie ice cream...on purpose! I mean, I chose granola over ice cream, because I wanted it more. I have been eating it with my homemade yogurt for my morning snack. Seems like in addition to baking my own bread and making my own yogurt, I am going to be hooked on granola too.

Here is the recipe. Amber and I are fiddling with it, to see if we can make it even better, but this is the basic recipe.
Amber's Mom's Granola:
  • 4 cups old-fashioned oatmeal
  • 2 cups flaked coconut (optional - I don't like coconut, so I left it out when I made it, but I didn't notice it when it was in the original batch)
  • 2 cups sliced almonds (I didn't have sliced almonds, or enough almonds, so I just chopped up whole almonds, threw in some peanuts, and extra cashews)
  • 1/2 - 3/4 cup olive or canola oil
  • 1/2 cup honey
Mix all these together in a large bowl and spread on a parchment lined baking sheet (this is essential - otherwise, it will stick to the pan and make a huge mess. Believe me, I know.)
Bake at 300 F for 40 minutes, stirring every 10 minutes. Let the granola cool for a few minutes, then return to the bowl and add:
  • 1 cup dried figs, chopped (I used Mission, but I bet you could use any variety you like)
  • 1 cup dried cherries (I used Bing, but I bet the sour cherries would also be good)
  • 1 cup dried cranberries
  • 1 cup dried apricots, chopped (I used unsulphered Turkish apricots from WF, they are less sticky and not so orange. And they taste great.)
  • 1/2 - 1 cup roasted cashews or hazelnuts
When completely cool, store in an airtight container. Might want to make it one that is hard to open, or it won't last very long.

Addendum: I just found this recipe on the internet, and it looks like it may originally have come from Nantucket Open-House Cookbook by Sarah Chase. I may have to check this book out at the library.

Wednesday, July 22, 2009

More fruitiness


To continue the fruit theme for the week - Emily brought me some fresh blueberries, picked from the bushes in her yard. They are small blueberries, almost like huckleberries. When I saw their size, my first thought was "I have to bake something with these!" So, I did. Blueberry-lemon muffins from one of my Moosewood Restaurant cookbooks. Since Benjamin is still away and the camera is still with him, there aren't any pictures. You will just have to imagine them, and enjoy this picture of the 20 some pounds of raspberries my parents picked today. I'm jealous. Raspberries don't do so well down here. Ah well. Blueberries are pretty good too.

Monday, March 16, 2009

Hummus and pita

This weekend, thanks to a trip to the Boulevard Bread Company in Little Rock, I was freed from baking a regular loaf of bread. I decided to use my baking time to make hummus and pita, using my new food processor. For those of you, like my dad, who want to know about the pocket in pita: I have no idea how the commercial producers get the pocket in the pita. I have never had any pockets. It must be a different sort of process.

I have made pita in the past, using the bread machine to do the mixing and rising. This time, I decided to try a recipe from one of my bread books. After using it, I can say that it is a pretty book, but not the most practical when it comes to actually baking bread.

Everything was going fine, until I got to the actual baking part. For one thing, the recipe had me letting the pita rise on the counter. This is a bad idea, because 1) the dough tends to stick to the counter, and 2) I have to handle it to get it on to the baking sheets. This destroys any bubbles and rising that may have taken place. The other thing that the book had wrong was the baking temperature/time ratio. 450 for 15 minutes?! 13 minutes (at which point I got wise and pulled the plug, er pita) was too much. But, they weren't destroyed, and still taste really good, especially when covered with hummus and feta.

I got the food processor last week as an early birthday present. We have been cooking along fine without a full sized machine for 8 years, but lately I have run into a bunch of recipes that would be a whole lot easier with one. Such as hummus. The recipe I use is from a Lebanese woman my mother met, and is pretty good. The end quality will be determined by the quality of chickpeas and tahini, as well as your ability to easily blend everything together.

This blending just got a whole lot easier. No more trying to divide everything in half to fit the mini-processor. No more try to make an undersized engine chop up the chickpeas. Just add ingredients and go! Yum Yum